• Hallo TT-Modellbahner, schön, dass du zu uns gefunden hast.
    Um alle Funktionen nutzen zu können, empfehlen wir dir, dich anzumelden. Denn vieles, was das Board zu bieten hat, ist ausschließlich angemeldeten Nutzern vorbehalten. Du benötigst nur eine gültige E-Mail-Adresse und schon kannst du dich registrieren.
    Deine Mailadresse wird für nichts Anderes verwendet als zur Kommunikation zwischen uns.
    Die Crew des TT-Boardes

Class 66 from UMF

Konrad

Foriker
Beiträge
58
Reaktionen
54
Ort
Ranger
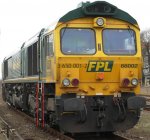
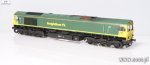
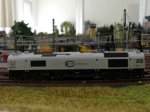
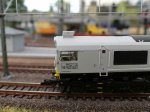
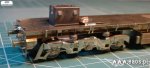
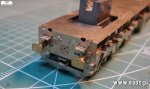
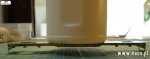
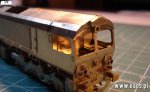
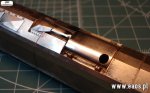
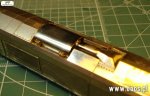
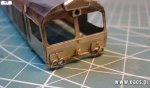
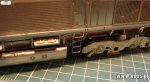
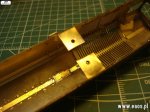
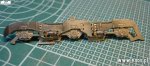
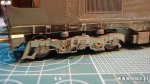
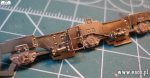
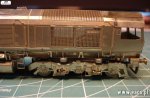
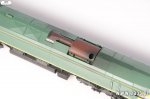
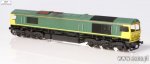
A lot of manufactures etc. said us that they making Class 66 but there is no any photo etc. I also made Class but it's truth and I have some photos of frame. I used BR120 Roco boogies because it's fits perfectly.
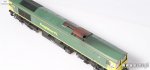
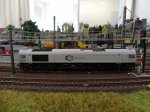
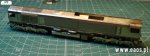
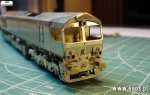
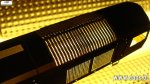
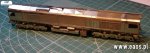
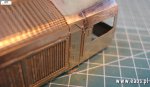
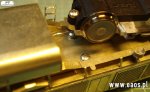
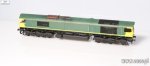
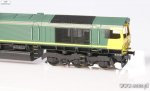
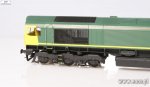
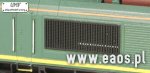
Here is the first photos. Once time I'm making both versions of Class, with small and symmetrical cooler on the roof and not symmetrical cooler on the roof and big coolers on the side walls.
Please write sth. about what do U think about it.
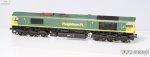
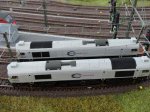
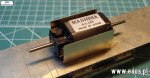
Loco will be available as a set and assmebled model. Set costs ~ 82EUR without Roco parts and engine. Price of assembled loco is not known now.
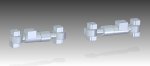
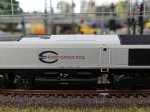
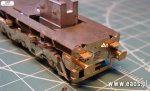
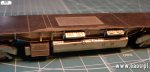
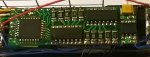
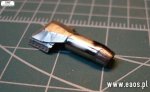
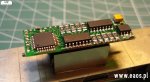
Set including photo etched parts, brass puffers, screws and nuts, electronic board, decals
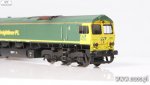
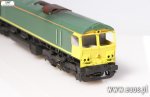
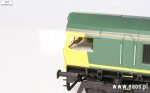
 

Anhänge

  • DSC01658.JPG
    DSC01658.JPG
    106,9 KB · Aufrufe: 838
  • DSC01660.JPG
    DSC01660.JPG
    130 KB · Aufrufe: 817
  • DSC01657.JPG
    DSC01657.JPG
    73,9 KB · Aufrufe: 877
  • DSC01661.JPG
    DSC01661.JPG
    97,1 KB · Aufrufe: 758
  • DSC01659.JPG
    DSC01659.JPG
    108,2 KB · Aufrufe: 754
Definately awesome! Looks really nice. I'm looking forward to see more. I always wanted a MRCE Class 66 for my freight trains and now there's a chance to get one in the future!

Good work!
Best regards
Gerrit
 
Next photos, frame is a beam. Its range is about 1KG. On the photo there is 1kg bottle with flux standing on the frame. There is no any deformation.
One interesting thing, frame is only one part. Its been designed that way U don't need any bender. All assembling U can make in hands.
 

Anhänge

  • DSC01576.JPG
    DSC01576.JPG
    80,8 KB · Aufrufe: 779
  • DSC01577.JPG
    DSC01577.JPG
    53,6 KB · Aufrufe: 774
  • DSC01528.JPG
    DSC01528.JPG
    150,1 KB · Aufrufe: 758
Yes it is, set U can order via e-mail or my web site. But wait until finishing loco.
Today I assembled body with details. There are not many things likesilencer etc. but loco looks silimar to original ;)
Take a look at the roof cooler, in my opinion looks quite good ;P
 

Anhänge

  • DSC01752.JPG
    DSC01752.JPG
    113,2 KB · Aufrufe: 741
  • DSC01751.JPG
    DSC01751.JPG
    128 KB · Aufrufe: 785
  • DSC01754.JPG
    DSC01754.JPG
    105 KB · Aufrufe: 736
  • DSC01713.JPG
    DSC01713.JPG
    144 KB · Aufrufe: 727
  • DSC01712.JPG
    DSC01712.JPG
    143,5 KB · Aufrufe: 702
Thanks for appreciation.
Today I made exhaust system with silencer. Firstly I thought that silencer will be very difficult to assemble but it wasn't.
Take a look at the photos, hole in silencer has a funny look. The diameter is similar to diameter of bucket ;)
To finish class it lost parts such as handrails, drips, stairs etc.
 

Anhänge

  • DSC01787.JPG
    DSC01787.JPG
    116,1 KB · Aufrufe: 661
  • DSC01801.JPG
    DSC01801.JPG
    113,2 KB · Aufrufe: 668
  • DSC01799.JPG
    DSC01799.JPG
    135,1 KB · Aufrufe: 656
  • DSC01803.JPG
    DSC01803.JPG
    126,8 KB · Aufrufe: 653
  • DSC01805.JPG
    DSC01805.JPG
    116,5 KB · Aufrufe: 677
Almost final step of assembling loco. This time I made troughs, drips and handrails. Also I fitted Mashina 1244D motor and electronic board. Inside loco there is a lot of free space for additional weight (now loco weights 150gr), sound decoder with two speakers etc.
Frame and body is assembled using screws and nuts. There are holes under the frame covered by sides of frame and boogies. To disconnect frame and body there is need to rotate boogies about 25 degrees and unscrew screws.
 

Anhänge

  • DSC01819.JPG
    DSC01819.JPG
    109,3 KB · Aufrufe: 566
  • DSC01822.JPG
    DSC01822.JPG
    107,1 KB · Aufrufe: 568
  • DSC01840.JPG
    DSC01840.JPG
    123,2 KB · Aufrufe: 568
  • DSC01832.JPG
    DSC01832.JPG
    113,7 KB · Aufrufe: 583
  • DSC01833.JPG
    DSC01833.JPG
    110,5 KB · Aufrufe: 574
Finally I made steps and cylinders. I made it manually, it takes too much time so in set cylinders will be casted with brass.
Now loco going to washing and painting.

Please don't by shy to comment my work.
 

Anhänge

  • DSC01846.JPG
    DSC01846.JPG
    123,4 KB · Aufrufe: 604
  • DSC01852.JPG
    DSC01852.JPG
    137,7 KB · Aufrufe: 609
  • DSC01851.JPG
    DSC01851.JPG
    114,1 KB · Aufrufe: 614
  • DSC01857.JPG
    DSC01857.JPG
    177,2 KB · Aufrufe: 646
  • DSC01855.JPG
    DSC01855.JPG
    108,4 KB · Aufrufe: 627
Did you have an idea how to build glass panes? (for windows and headlights)
I'm sorry for my english (i try to combine my bad school english with the google translator - to read english is no problem but wrinting... :shy:)
...Please don't by shy to comment my work...
It seems to be normal.
A large proportion of the community does not speak english cause they did not learned it at school. Some guys are to shy for writing in english and some guys waste there time to discuss banalities or unchangeable things for more than hundred postings at other threads.
They have no more words left if someone shows his own ingenious ideas because there is nothing to complain about. ;)
In my opinion each of your photos has been viewed for more than 100 times - take a look at "Kontrollzentrum" (at the top left) and "Anhänge" (on the bottom left).
 
To make glasses I'll add to trial special pattern which can be printed on the paper. Than U can take marker and draw on the plexiglas surfacje shapes. Than it necessary to cut it by scissors. After painting and assembling electronics glasses can be glued inside the cabin.
I made that way headlight for my older product - SM42.
Glasses for headlights will be included to set. I have stempel for that.

Don't afraid to reply using german, it's german forum ;)
I'll handle with it but I can't write anything in german ;)
 
Finally I have some time to paint this loco. Painting was very difficult but I handle with it like U see. Now I'm waiting for Freightliner decals.
 

Anhänge

  • DSC03457.JPG
    DSC03457.JPG
    91,7 KB · Aufrufe: 705
  • DSC03459.JPG
    DSC03459.JPG
    139 KB · Aufrufe: 710
  • DSC03461.JPG
    DSC03461.JPG
    131,4 KB · Aufrufe: 685
  • DSC03464.JPG
    DSC03464.JPG
    128,3 KB · Aufrufe: 677
  • DSC03466.JPG
    DSC03466.JPG
    110,5 KB · Aufrufe: 698
Second part of photos.
 

Anhänge

  • DSC03468.JPG
    DSC03468.JPG
    105,1 KB · Aufrufe: 627
  • DSC03469.JPG
    DSC03469.JPG
    137,5 KB · Aufrufe: 620
  • DSC03471.JPG
    DSC03471.JPG
    101,8 KB · Aufrufe: 717
Hello Konrad,

very nice model :respekt: but ...

the ladder is not correct ?!


greeting
BMM
 

Anhänge

  • Class_Aufstieg_TT-Board.jpg
    Class_Aufstieg_TT-Board.jpg
    95,5 KB · Aufrufe: 617
I want to present U an trial for Class 66. I already made photo trial separated on five parts of assembling loco. Each part will be expanded of some text explanation with foto. Be wolcome to comment my trial, to download please visit my web site and click text down on the site.
 
I made 3D cylinders for boogies. It will be printed 3D in well quality and than casted with brass. Take a look.
 

Anhänge

  • si?ownik H0.jpg
    si?ownik H0.jpg
    107,6 KB · Aufrufe: 673
At the moment I've got all parts for UMF Class 66. In set U can find electronic board with all light signs, boogie cylinders and decals etc. In conclusion all parts need to assemble locomotive.
Available decals:
- Freightliner witb 7 different numbers
- DB with 2 different numbers
- EWS witg one number

Please ask me for all UR wonderings on forumTT-Board and also on my e-mail:
rangerttmf(at)gmail.com
 
Finally I can present assembled and ready to go model. Locomotive has all polish types of lights, driving with 5 poles Mashima motor.
Take a look at the photos and find details such as windscreen wipers ;)
Please don't be shy to comment UMF model.
 

Anhänge

  • DSC03914.jpg
    DSC03914.jpg
    273,6 KB · Aufrufe: 596
  • DSC03918.jpg
    DSC03918.jpg
    269,7 KB · Aufrufe: 576
  • DSC03923.JPG
    DSC03923.JPG
    271,9 KB · Aufrufe: 579
  • DSC03961.JPG
    DSC03961.JPG
    281,8 KB · Aufrufe: 607
  • DSC03966.JPG
    DSC03966.JPG
    275 KB · Aufrufe: 586
Graben wir's mal wieder aus (das Thema), denn es gibt was zu sehen.

2018 hatte ich ein Bausatzblech für die Class 77 bei Konrad (UMF) geordert.
Auch wenn der Bausatz als "Class 66" bezeichnet wird, ist er tatsächlich für eine 77.
Das auffälligste Merkmal: die dritte Tür auf der einen Seite gibt es bei der 66 nicht.

Das Bausatz-Blech ist ziemlich vollgepackt - es braucht also Zeit und Geduld.
Anhand der Bild-Serien, die Konrad auf der Homepage zum Download bereitgestellt hat, bin ich gut zurechtgekommen mit dem Biegen und Löten. Ich bin fast immer genau nach den Bildern vorgegangen und habe nur an wenigen Stellen ein paar Sonderlocken angebaut.

Da ich eine ECR-Lok bauen wollte, musste auf jeden Fall eine andere Klima-Anlage auf's Dach und auch die Antenne wurde entsprechend ersetzt. Die nötigen Teile habe ich mir als NS-Ätzblech gezeichnet bzw. stammen aus der Bastelkiste.

Auf dem Bausatzblech sind zwar zwei KKK zum Biegen und Löten mit drauf, ich habe aber magnetische PeHo-KKK verbaut, damit habe ich bisher gute Erfahrungen gemacht.

Im Inneren bin ich ebenfalls von der originalen Bauanleitung abgewichen, da ich einen Sound-Decoder einbauen wollte. Es ist recht eng im Gehäuse. Deshalb habe ich mir Leiterplatten für Decoder, Beleuchtung und Pufferkondensatoren angefertigt und diese direkt unters Dach platziert.

Das größte Problem dürften inzwischen die Drehgestelle werden. Es braucht eine Roco 120er dafür...
Die Kardanwellen von der 120er habe ich mit 1mm rundem Ms-Profil verlängert (Gleiches Prinzip wie hier bei der Maxima).

Konrad hat auch die Schwingungsdämpfer für die Drehgestelle (Ms-3D-Druck) mit dazu gepackt - das wertet die Optik der Drehgestelle nochmal um einiges auf.

Im Lieferumfang des Bausatzes sind Decals enthalten, aber natürlich für die polnischen Varianten.
Die Decals für die ECR habe ich nach Fotos selbst gezeichnet und beim Profi drucken lassen.


Auch bei diesem Projekt sind es am Ende zwei Loks geworden - jede mit ihrer eigenen Nummer, sonst identisch.
Eine bleibt bei mir, die andere geht an Torsten von den TT-Bayern.
Damit ist es jetzt auch genug mit dem Class77-Blechorigamie. Die nächsten Projekte warten bereits.

Sollten die folgenden Bilder bei dem einen oder anderen den Nachmachtrieb auslösen - immer ran, zumindest der Bausatz ist bei UMF aktuell zu haben.
 

Anhänge

  • ttjoerg_Cls77_01.JPG
    ttjoerg_Cls77_01.JPG
    233,6 KB · Aufrufe: 298
  • ttjoerg_Cls77_03.JPG
    ttjoerg_Cls77_03.JPG
    185,5 KB · Aufrufe: 294
  • ttjoerg_Cls77_05.JPG
    ttjoerg_Cls77_05.JPG
    126,7 KB · Aufrufe: 288
  • ttjoerg_Cls77_06.JPG
    ttjoerg_Cls77_06.JPG
    149,5 KB · Aufrufe: 287
  • ttjoerg_Cls77_07.JPG
    ttjoerg_Cls77_07.JPG
    191,5 KB · Aufrufe: 290
  • ttjoerg_Cls77_08.JPG
    ttjoerg_Cls77_08.JPG
    140,9 KB · Aufrufe: 287
  • ttjoerg_Cls77_09.JPG
    ttjoerg_Cls77_09.JPG
    122,8 KB · Aufrufe: 302
Zuletzt bearbeitet:
Zurück
Oben